Tags: cnn neural networks bruteforce
Rating:
Hacking neural networks in the FAUST CTF 2018.
This is a blog-styled follow-up on the [slides](https://www.sigflag.at/assets/posts/jodlgang/slides-faustctf2018-jodlgang.pdf) by [@iVogl](https://twitter.com/iVogl/status/1002728455878987776) on solving the `JODLGANG` challenge from the [FAUST CTF 2018](https://2018.faustctf.net/), which is a nice Python application with a neural-network-driven authentication ;)
## Application Overview
To get a feeling for the application, let's spin up our web browser and navigate to port `8000`.
We will be presented with a nice [Boostrap](https://getbootstrap.com/) website and an option to sign in.

**Figure 1 -** Sign-In Page
We can enter an e-mail address and upload a photo.
The request will then most likely fail with *Permission denied*.
I find it interesting that the request takes a while (up to 10 seconds), so it seems, there is some heavy computation going on in the background.
Let's take a look at the source code.

**Figure 2 -** Source Overview
`JODLGANG` is a Python web application based on the [Django framework](https://www.djangoproject.com/) and [uWSGI](https://uwsgi-docs.readthedocs.io/en/latest/), which serves as an application server for dynamic content (e.g. Python calls).
- `jodlenv` contains the Python environment with all the necessary packages installed.
- `data` seems to be empty at all time.
- `jodlgang` contains the Python source code with three packages: `jodlgang` + `jodlplatform` for serving the site and `tensorwow`, which seems to be a custom [TensorFlow](https://www.tensorflow.org/) implementation.
- `jodlgang/cnn_weights.h5` holds almost 500 MB of weights. In ML, weights represent the *state* or *configuration* of a machine learning model. We can assume that these weights will be loaded to instantiate some classifier.
- `jodlgang/db.sqlite3` is an SQLite database which stores some user credentials.
- `jodlgang.log` contains some very interesting log entries.
### `jodlgang.log`
The log file is very helpful to understand what this application probably does in the background:
```
Retrieving face recognition CNN
Converting image to numpy array
Inference took 12.503313541412354 seconds ...
Inference took 12.846878051757812 seconds ...
Retrieving face recognition CNN
Converting image to numpy array
Inference took 11.501536846160889 seconds ...
Exception in face recognition: (<class 'django.core.exceptions.PermissionDenied'>)
```
This is why our requests are taking so long: There is a face recognition going on in the background!
More specifically, a [Convolutional neural network (CNN)](https://en.wikipedia.org/wiki/Convolutional_neural_network), which is a commonly used network in machine learning for face recognition.
CNNs are computationally very expensive due to a lot of matrix operations.
Our server is not equipped with GPUs, so these calculations will be carried out on the CPU - which is slow as hell.
Now we also know why we have 500 MB of weights in `jodlgang/cnn_weights.h5`. These serve as the *parameters* for the CNN model.
That means, the model was already trained on a lot of images and can be used for classification now.
#### A quick explanation of what's going on for non-machine-learners
If you want to do face recognition, you need a thing (a *model*), that takes an image and tells you who's that person (or object) on that image.
Since nobody knows how to design such an algorithm (the *model*), we *train* a model to do this for us.
This works like so: Take a neural network (the *model*) and give it a few thousand or even a million images along with the person names (the *labels*).
The model will try to learn a mapping from images to person names because we showed the network which images (yes, there are more than one!) correspond to which name (*label*).
This trained model can be represented by a set of learned parameters (the *weights*).
Finally, if we instantiate the model again with the learned weights, we can use it to classify a new (yet unseen) image.
To keep it simple, the number of possible outputs (person names) will be restricted to a manageable size, such that the network can decide which person is on an image from a set of e.g. 100 possible persons.
This is called a classification task.
### `db.sqlite3`
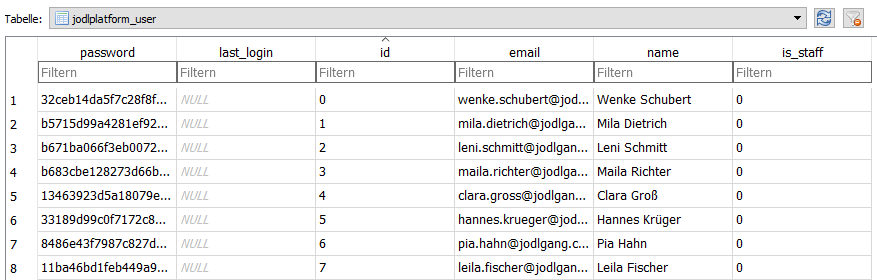
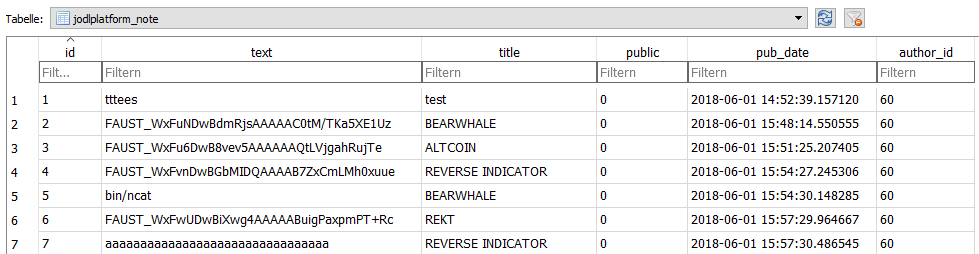
The database contains some Django-specific tables, authentication stuff and the tables `jodlplatform_note` + `jodlplatform_user`.
Most of the tables are empty, but `jodlplatform_user` (see Figure 3) contains some interesting user credentials with hashed passwords and `jodlplatform_note` contains some flags already (see Figure 4).
In total, there are 530 user entries. Notes were added (and removed?) during the competition.

**Figure 3 -** Table `jodlplatform_user`

**Figure 4 -** Table `jodlplatform_note`
## The Face Authentication Backend
So, let's recap what we found out so far:
- We can sign in with an e-mail address and a photo.
- The photo will most likely be piped to a CNN for face recognition.
- The table `jodlplatform_user` suggests that there are 530 registered users.
- The table `jodlplatform_note` probably contains our flags, but we don't know how to get there from the web application yet.
Let's dig deeper into the code base.
The `jodlplatform/backends.py` file serves as a good starting point:
```python
class FaceAuthenticationBackend(object):
def authenticate(self, request, **kwargs):
if 'face_img' not in request.FILES:
raise PermissionDenied
try:
user = User.objects.get(email=kwargs["username"])
except User.DoesNotExist:
raise PermissionDenied
logger.debug("Retrieving face recognition CNN")
cnn = get_face_recognition_cnn()
try:
logger.debug("Converting image to numpy array")
face_img = np.array(Image.open(request.FILES['face_img'])).astype(np.float)
except Exception as e:
logger.error("Exception in face recognition: {} ({})".format(str(e), type(e)))
raise PermissionDenied
if len(face_img.shape) != 3 or face_img.shape[0] != cnn.input_height or face_img.shape[1] != cnn.input_width or face_img.shape[2] != cnn.input_channels:
logger.info("Dimensions mismatch")
raise PermissionDenied
try:
before = time.time()
class_probabilities = cnn.inference(face_img[None, :])[0]
after = time.time()
logger.debug("Inference took {} seconds ...".format(after - before))
most_likely_class = np.argmax(class_probabilities)
if class_probabilities[most_likely_class] <= 0.5 or user.id != most_likely_class:
raise PermissionDenied
return user
except Exception as e:
logger.error("Exception in face recognition: {} ({})".format(str(e), type(e)))
```
As suspected by the log entries already, the image is used as the input for a face recognition model which is going to authenticate us.
The final authentication check is performed in lines 43 - 45:
```python
most_likely_class = np.argmax(class_probabilities)
if class_probabilities[most_likely_class] <= 0.5 or user.id != most_likely_class:
raise PermissionDenied
return user
```
Let's go through this snippet step by step:
- The `most_likely_class` variable stores the indices of the maximum values within the `class_probabilities` array.
This is a pretty standard thing to do in a classification network. If we have a network, that can classify `n` elements, we will have `n` outputs in the end, where each output represents a probability from `0.0 - 1.0` and indicates that the image shows this specific class.
Since this a face recognition CNN, it will probably try to predict the person on the image, from a set of `n` possible persons.
So the `most_likely_class` will hold the index of the person predicted with the highest confidence.
- The next line checks for two things now. First, the confidence (or probability) needs to be greater than 50 % - this makes sense to avoid false positives.
The second check will ensure that the predicted person is the person, that wants to sign in.
The `user.id` looks up the `id` of the user, associated with the entered e-mail address.
- In the end, only if our face is recognized correctly, we will get authenticated.
So far so good. The code will authenticate us if we supply the correct image of that user.
What next? Maybe we can reverse the model, which classifies the user from an image?

### The CNN for Face Authentication
Let's observe the model in `tensorwow/model.py`.
As [@iVogl](https://twitter.com/iVogl/status/1002728455878987776) recognized correctly, this is a [VGGNet architecture](https://arxiv.org/pdf/1409.1556.pdf),
as designed by Simonyan and Zisserman from the Visual Geometry Group at the University of Oxford.
```python
self._layers = OrderedDict([
("conv1_1", conv1_1),
("conv1_2", conv1_2),
("pool1", pool1),
("conv2_1", conv2_1),
("conv2_2", conv2_2),
("pool2", pool2),
("conv3_1", conv3_1),
("conv3_2", conv3_2),
("conv3_3", conv3_3),
("pool3", pool3),
("conv4_1", conv4_1),
("conv4_2", conv4_2),
("conv4_3", conv4_3),
("pool4", pool4),
("conv5_1", conv5_1),
("conv5_2", conv5_2),
("conv5_3", conv5_3),
("pool5", pool5),
("fc6", fc6),
("fc7", fc7),
("fc8", fc8),
])
```
We also see that the last fully-connected layer has exactly 530 output nodes.
So we have exactly as many output nodes as users in the database.
```python
fc8 = FullyConnectedLayer(4096, 530, Softmax(),
TruncatedNormalInitializer(mean=0, stddev=1e-2),
ConstantInitializer(0))
```
Upon further investigation, we can see that all the building blocks for this network are hand-crafted in the `layers.py`, `functions.py` and `initializer.py` modules of the `tensorwow` package.
This is weird because usually, people are using standard (and highly optimized) libraries like [TensorFlow](https://www.tensorflow.org/) for this.
Doing a lot of those operations needed for such a deep network in Python is not the most efficient thing to do.
At least, `numpy` is used for the core matrix operations.
So, can we reverse this model? No.
We certainly can't reverse how this trained deep neural network comes to its prediction.
Well, in theory, this would be possible, but that's still an open research question.
We will come back to that in the end ;)
## The problem
What can we do instead?
Remember, we have 530 users. And 530 output nodes.
And the network will always come up with a prediction if the threshold is above 50 % ... after the final [softmax layer](https://en.wikipedia.org/wiki/Softmax_function#Neural_networks).

The problem is, that having as many output nodes as users is not the best idea, since you are missing a *not-one-of-the-530-persons* class or a *not-even-a-person* class.
We can exploit this by feeding arbitrary images to the network, that will probably result in a confidence value above 50 % for some user. [@iVogl](https://twitter.com/iVogl/status/1002728455878987776) showed in [his tweet](https://twitter.com/iVogl/status/1003101270759047168) that you could even us potatos and achieve 63 % confidence for *Helena Döring*.
## The stupid (but effective) solution
We can't reverse the network easily.
But we can brute-force the network with (random or not-so-random) images and observe the (deterministic) output ;)
Because random images may not work so well, let's use some real faces from the [CelebA dataset](http://mmlab.ie.cuhk.edu.hk/projects/CelebA.html), a dataset of 202,599 faces.
. 2015")
**Figure 5 -** Ziwei Liu, Ping Luo, Xiaogang Wang, Xiaoou Tang: ["Deep Learning Face Attributes in the Wild"](http://mmlab.ie.cuhk.edu.hk/projects/CelebA.html). Proceedings of International Conference on Computer Vision (ICCV). 2015
So, let's grab all the computing power we can get and do the following:
- Take a random image from the CelebA dataset
- Feed it to the pre-trained model
- Inspect the classification result
- If `class_probabilities[most_likely_class] > 0.5` (highest confidence is more than 50 %), we found a matching user
- Store a mapping with this random image and the resulting `most_likely_class` (user id)
- Repeat
The cool thing is, that this can be done in parallel and offline (without making any requests to other teams).
The bad thing is, that it needs a lot of computing power. Luckily, there's a service for that nowadays.
Renting a CPU-optimized cloud machine on [Digital Ocean](https://www.digitalocean.com/pricing/) with 46 vCPUs costs a bit more than 1$ per hour and finishes this task very fast ;)
Here is the code snippet for performing the steps mentioned above.
Source code credits go to [@iVogl](https://twitter.com/iVogl/status/1002728455878987776).
```python
from tensorwow.model import FaceRecognitionCNN
import json
import numpy as np
from PIL import Image
import os
from os.path import isfile, join
import shutil
IMG_DIR = 'img_align_celeba/' # the extracted CelebA dataset
IMG_OUT = 'img_out/' # found images, named by user id
cnn = FaceRecognitionCNN()
cnn.restore_weights('cnn_weights.h5')
# class label mappings for debug output
with open('jodlplatform/migrations/class_label_mapping_names.json') as f:
name = json.load(f)
# sample 1.000 random images
for f in np.random.choice(os.listdir(IMG_DIR), 1000):
face_img = Image.open(IMG_DIR + f)
face_img = face_img.resize((224, 224))
face_img = np.array(face_img).astype(np.float)[None, :] # extend by one dim
probabilities = cnn.inference(face_img)
userid = np.argmax(probabilities)
chance = probabilities[0, userid]
if chance > 0.5:
print ('Name', name[userid], 'Probability', probabilities[0, userid], 'Filename', f)
shutil.copyfile(IMG_DIR + f, IMG_OUT + str(userid) + '.jpg')
```
We extracted 365 out of 530 images. With that, we could exploit ~ 70 % of the logins.
It was just a matter of time to exploit even more...

**Figure 6 -** Bruteforced images and their user ids
## Finally, submitting some flags
You can login with all the 530 users on every team. Just don't forget to also send the `csrfmiddlewaretoken` of the form as well:
```html
<input type='hidden' name='csrfmiddlewaretoken' value='xvgZi4H4v4pFtM3o2Z0SZhNtXgoH7TkQNIEJtbw7JGNkTWpmdHiAaYV7gLVUsPP7' />
```
Once logged in, click the *View your notes only* (the `/personal` page) and collect the flags set by the game server.
")
**Figure 7 -** Your personal notes (flags)
### Perfect, right?

Well, almost. We forgot something.
We can not retrieve 530 (or our brute-forced 365) flags per team since the game server only sets the flags for one user - the user with the same id as the team id.
Shit. We not only made ~ 200 unsuccessful requests per active team on average, per tick (3 minutes), we also disclosed our hard-earned images, that can be used as the login.
So, what do we learn from that? Think twice before deploying an exploit to all the other teams and monitor the results ;)
The solution is trivial. Only login with the correct user for each team.
We were team `60` and the database shows the user `Theo Fuchs` with e-mail `[email protected]` for user id `60`.
Alternatively, the e-mail address could also be extracted from the sign-in website:
```html
<div class="container">
<footer class="pt-4 my-md-5 pt-md-5 border-top">
<div class="row">
Contact our local ambassador Theo Fuchs
</div>
</footer>
</div>
```
## The smart solution
Bruteforcing is nice and fast (at least in terms of implementation time), but it has its limitations.
If some of the output classes were trained on something completely different than faces, it would take us a long time to find proper images for that.
The smart way to solve this problem would be to go the other way around and do [Activation Maximization](https://raghakot.github.io/keras-vis/visualizations/activation_maximization/).
This technique uses a loss function, that is large when activations are large (and by activations, we mean certain outputs here).
Thus, we can differentiate the activation maximization loss w.r.t. the input image and find input images that maximize a certain activation.
This could have been done during the CTF competition if the real [TensorFlow](https://www.tensorflow.org/) library would have been used, since there are APIs available for that.
As we have seen, the service instead used its own `tensorwow` implementation and a custom format for the weights.
It would have been possible to reimplement this correctly in a standard library.
Maybe there will be a follow-up on that someday.
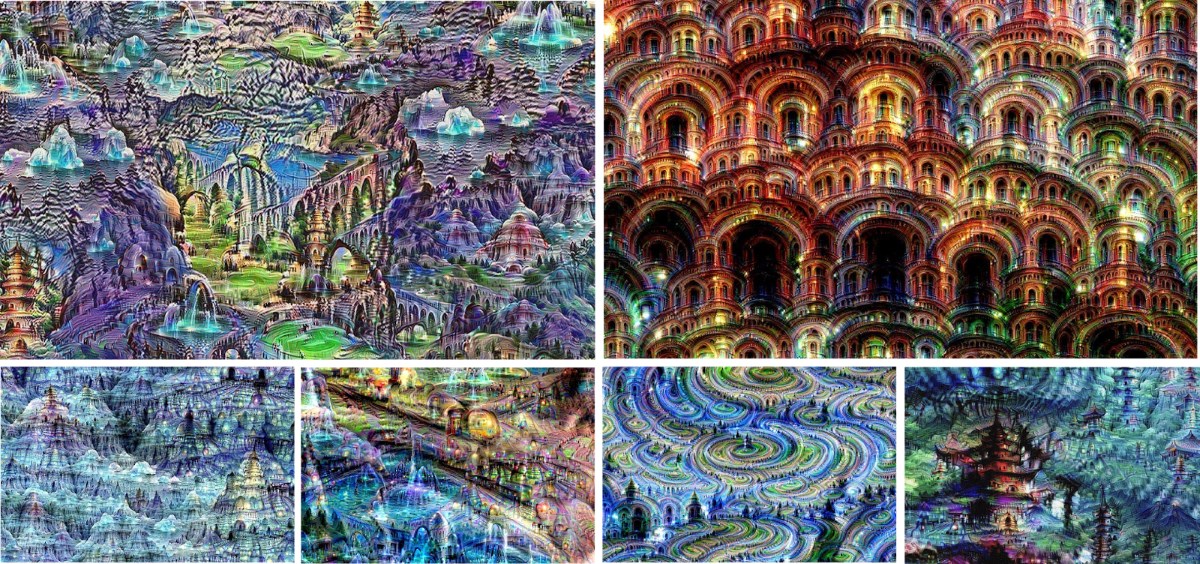
In the meantime, you can read through an article on ["How convolutional neural networks see the world"](https://blog.keras.io/how-convolutional-neural-networks-see-the-world.html)
to understand some details on activation maximization and see the images that would possibly result from such an approach.

**Figure 8 -** Alexander Mordvintsev, Christopher Olah, Mike Tyka: ["Inceptionism: Going Deeper into Neural Networks"](https://ai.googleblog.com/2015/06/inceptionism-going-deeper-into-neural.html). Google AI Blog. 2015.


