Tags: laser wireshark hid
Rating: 5.0
## Official description
> You can see pictures of a robot arm laser engraver attached.
> Can you figure out what it is engraving?
>
> Note: the flag should be entered all in upper case. It contains underscores but does not contain dashes.
>
> Good luck!
We are given a ZIP file containing
[engraver.pcapng](https://github.com/google/google-ctf/raw/66de2426aaf3e37e4314714d1eb588d5804c62d6/2022/hardware-engraver/attachments/engraver.pcapng),
[robot.jpg](https://raw.githubusercontent.com/google/google-ctf/66de2426aaf3e37e4314714d1eb588d5804c62d6/2022/hardware-engraver/attachments/robot.jpg)
and
[robot_engraving.jpg](https://raw.githubusercontent.com/google/google-ctf/66de2426aaf3e37e4314714d1eb588d5804c62d6/2022/hardware-engraver/attachments/robot_engraving.jpg)
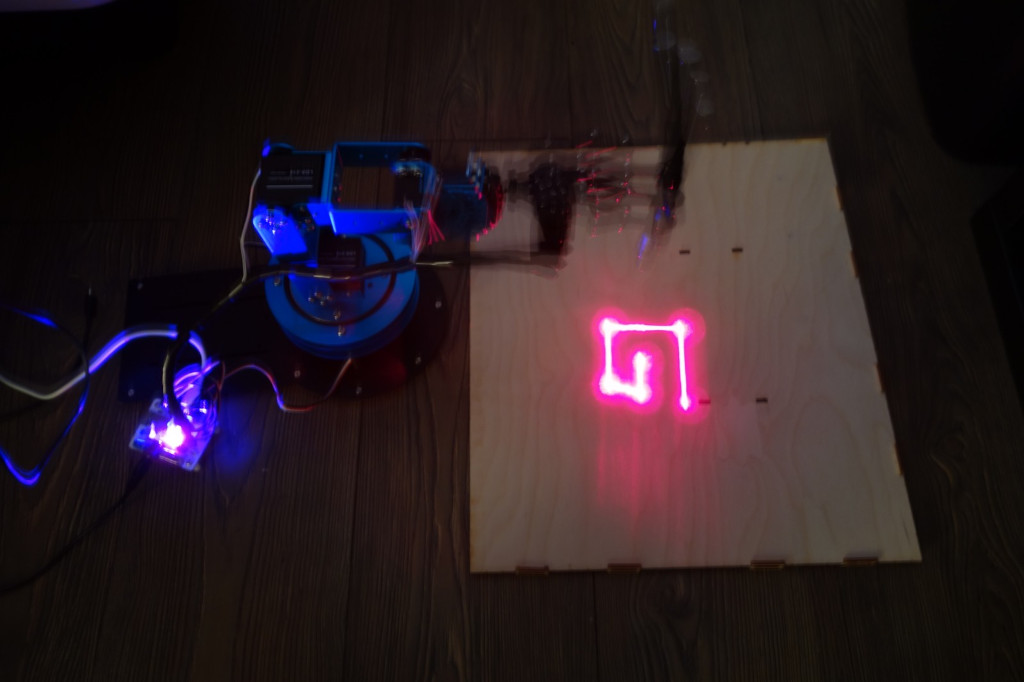
robot_engraving.jpg showing a 6-axis robot drawing G letter with a laser pointer
## 1. Exploration
### USB capture
Let's start by opening `engraver.pcapng` in Wireshark. We discover USB traffic.
As the capture was started before connecting the device, it contains the USB
device initialization:
- `GET DESCRIPTOR DEVICE` response indicates a [STMicroelectronics LED badge, mini LED display, 11x44](https://linux-hardware.org/index.php?id=usb:0483-5750) (ID `0x0483:0x5750`).
- `GET DESCRIPTOR CONFIGURATION` response indicates that this device only has one [USB HID interface](https://en.wikipedia.org/wiki/USB_human_interface_device_class) with no standard subclass (`0x00`).
- Then the host fetches some USB descriptors string:
- `0x01`: MindMotion SOC Solutions
- `0x02`: Hiwonder
- `0x03`: MM32F103RB
The remaining packets of the capture correspond to HID data transfers as
Wireshark does not include a dissector for this device.
### Robot arm identification
The USB capture indicates `MindMotion SOC Solutions Hiwonder MM32F103RB`.
The pictures [robot.jpg](https://raw.githubusercontent.com/google/google-ctf/66de2426aaf3e37e4314714d1eb588d5804c62d6/2022/hardware-engraver/attachments/robot.jpg)
and
[robot_engraving.jpg](https://raw.githubusercontent.com/google/google-ctf/66de2426aaf3e37e4314714d1eb588d5804c62d6/2022/hardware-engraver/attachments/robot_engraving.jpg)
show a 6-axis blue robot holding a laser pointer.
With a bit of online search, we find that this robot is the
[LeArm by Hiwonder](https://www.hiwonder.com/store/learn/2.html).
More search indicates that we can interface with robot with
<https://github.com/ccourson/xArmServoController> library.
## 2. Proposed solution
We extract the HID data from the USB capture and dissect it by analysing
[xArmServoController](https://github.com/ccourson/xArmServoController)
source-code.
We notice that only 3 servomotors are used to draw, which means we don't need
to compute a reverse kinematic model of the arm. We finally plot the letters
the robot was drawing during the USB capture and get the flag.
### HID data dissection
We write a Python script to extract HID data using Scapy.
We skip a fixed header defined in [xArmServoController/xarm/controller.py](https://github.com/ccourson/xArmServoController/blob/33cd7a0bd924c60a758ed69e85294620e72abc5b/Python/xarm/controller.py#L143).
```Python
from scapy.all import rdpcap
p = rdpcap("engraver.pcapng")
for pkt in p:
l = pkt.fields["load"]
if l[14] != 0x09 or l[15] != 0x00 or l[16] != 0x00:
continue
# Skip 5555080301 header (SIGNATURE, SIGNATURE, length, CMD_SERVO_MOVE, 1)
c = l[27+5:27+5+5]
if not c:
continue # ignore empty
duration = c[0] + (c[1] << 8)
servo = c[2]
position = c[3] + (c[4] << 8)
print(duration, servo, position)
```
We get 418 combinations of durations, servomotor identifier and position:
```
500 1 2300
1500 2 1300
1500 3 1700
[...]
1500 4 2500
1500 5 1600
1500 6 1500
```
### (Not) computing inverse kinematic
A first look at the previous data can be scary as we notice that all 6
servomotors are being driven. This means that we might need to compute a inverse
kinematic model of the arm to get the pointer position and orientation from
this data.
After looking more closely, we notice 43 repetitions of a position reset
pattern:
```
500 1 2300
1500 2 1300
1500 3 1700
1500 4 2500
1500 5 1600
1500 6 1500
```
Let's replace this pattern by `0`.
**We now notice that only servomotors 1, 2 and 3 are being driven.**
Servomotor 1 is always moving between position `2300` and `2400`. A look at
the LeArm documentation reveals that it is the gripper. On the provided pictures
this gripper is positioned on the laser pointer button.
**Servomotor 1 turns on and off the laser pointer.**
We can consider a 2-axis drawing robot using the pan and tilt of the gripper.
### Plotting the letters
We write the following Python script that computes the arm state after each
command and then plot each succession of movements between resets:
```Python
import matplotlib.pyplot as plt
def plot_data(states, n, laser_btn=True):
# Remove points when laser is off
for i in range(len(states[1])):
if states[1][i] == 2300 and laser_btn:
states[2].pop(i)
states[3].pop(i)
# Inverse X axis
states[2] = [-x for x in states[2]]
# Plot
plt.figure()
plt.ylim(1500 - 50, 1700 + 50)
plt.xlim(-1500 - 50, -1300 + 50)
plt.axis('off')
plt.plot(states[2], states[3], linewidth=50)
plt.savefig(f"out/{n}.png")
plt.close()
# Build arm state after each command
states = {}
states[1] = [2300]
states[2] = [1300]
states[3] = [1700]
n = 0
with open("engraver_data_decoded", "r") as f:
for line in f.readlines():
c = line.split()
# Reset between letters
if len(c) < 2:
n += 1
if len(states[1]) > 1:
plot_data(states, n)
states[1] = [2300]
states[2] = [1300]
states[3] = [1700]
continue
duration, servo, position = map(int, c)
if servo != 1:
states[1].append(states[1][-1])
if servo != 2:
states[2].append(states[2][-1])
if servo != 3:
states[3].append(states[3][-1])
states[servo].append(position)
```
This script is imperfect as it does not consider timing and
persistence of vision, but it was enough to flag this challenge.
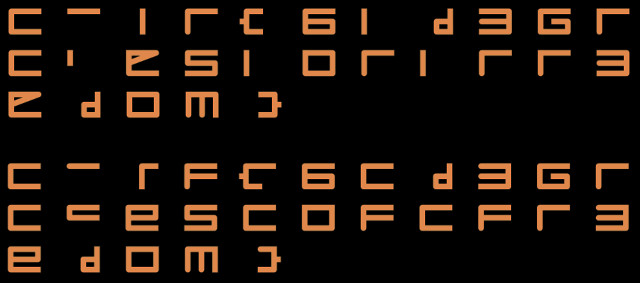
Script output with laser_btn=True (top) and laser_btn=False (bottom)
We recognize "fr3edom" at the end of the flag, which after a bit of thinking led
to `CTF{6_D3GREES_OF_FR3EDOM}`.


